Since 1985 » Simple. Predictable. Profitable.
Advanced Techniques: Internal Sinus Lift
Page 1 | Page 2 | Page 3 | Page 4 | Page 5 | Page 6
Internal Sinus Lift Technique
 |
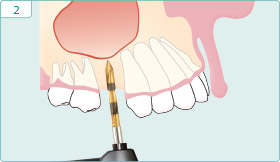 |
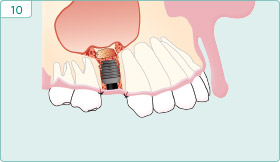
| Note the minimal residual bone depth of 5.0–8.0mm. | Prepare osteotomy beginning with the 2.0mm Pilot Drill. |
 |
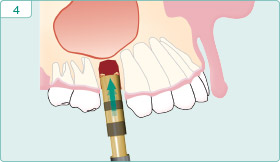 |
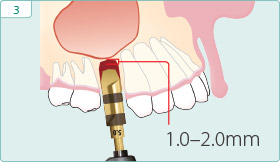
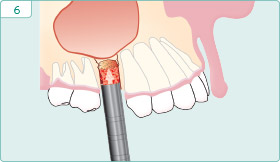
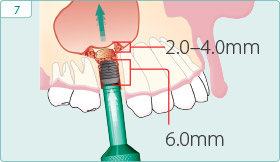
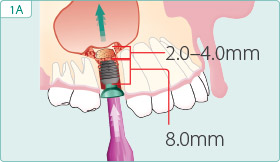
| Continue to prepare osteotomy with successively larger reamers to the extent that 1.0–2.0mm of undisturbed bone remains below the sinus floor. A 5.0mm diameter implant has been chosen for this case. | Place a 5.0mm Bicon sinus lift osteotome into the osteotomy and engage the area slightly below the sinus floor. |
 |
 |
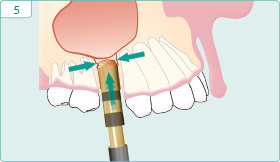
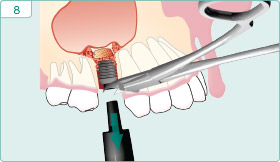
| Gently tap the osteotome and create a hairline fracture around the floor of the osteotomy. | Place a bone graft material such as SynthoGraft™ into the socket. |
 |
 |
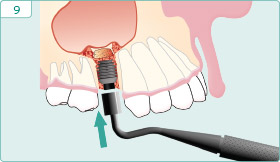
| Introduce the implant into the osteotomy site with the implant inserter and use the implant to raise the sinus floor. | Disengage the implant inserter from the implant. Insert and cut the healing plug. |
 |
 |
| Place bone graft material over the shoulder of the implant. | Suture and wait a minimum of 14-16 weeks prior to uncovering. |
Internal Sinus Lift with Sinus Lift Temporary Abutment
 |
 |
| Alternatively, a Bicon sinus lift temporary abutment may be inserted into the implant to prevent the implant from migrating into the sinus. | Either suture around or over the sinus lift abutment. |