All-Ceramic Crown: Shouldered Abutment
Page 1 | Page 2 | Page 3 | Page 4 | Page 5 | Page 6
Extra-Oral Cementation (with DiamondLink™)
 |
 |
 |
 |
 |
 |
 |
 |
 |
 |
 |
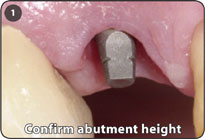
1. Confirm appropriateness of the abutment height and width by inserting it into the implant well with finger pressure prior to seating the crown.
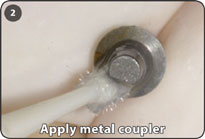
2. Apply metal coupler (part # C313) to the abutment.
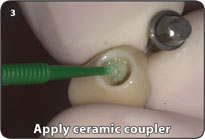
3. Apply ceramic coupler(part # B204) to the internal aspect of the aluminum oxide sleeve.
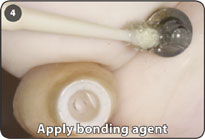
4. Apply bonding agent to both the crown and the abutment prior to their being assembled. Use air to minimize the layer of bonding agent. Light cure bonding agent for 10 seconds with the Xenon Plasma Curing System or comparable light unit.
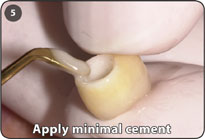
5. Apply a minimal amount of DiamondLink™ resin-cement to the internal aspect of the all-ceramic crown or onto the abutment.
6. Assemble the crown and abutment. DiamondLink™ resin-cement will take approximately 4 to 6 minutes to set.
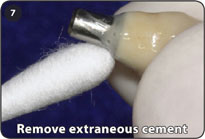
7. Remove extraneous cement from the abutment and crown.
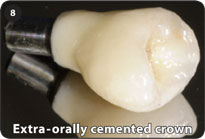
8. Final view of extra-orally cemented crown prior to insertion.
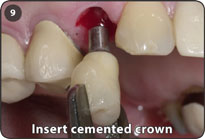
9. Insert the cemented crown and abutment unit into the implant well.
10. Seat the final crown and abutment unit using a seating jig in an abutment seating tip or a healing abutment inserted into a threaded straight handle to protect the crown and to orientate the seating force in the long axis of the implant well.
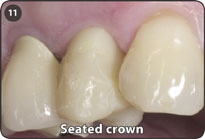
11. Seated crown.
Notes: Extra-oral cementation is usually the preferred way of cementing all-ceramic crowns.
All-ceramic crowns on 3.5mm abutments should be extra-orally cemented. Use DiamondLink™ by DRM or a comparable cement.
The use of a seating jig fabricated in a caliper alignment device will assure application of seating forces in the long axis of the abutment post and implant well.