Integrated Abutment Crown™ (IAC): Temporization Technique
Page 1 | Page 2 | Page 3 | Page 4 | Page 5 | Page 6 | Page 7 | Page 8 | Page 9 | Page 10 | Page 11 | Page 12
Temporization Technique — Option 1
 |
 |
 |
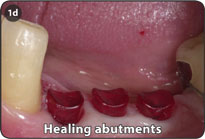 |
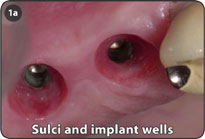
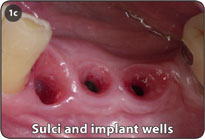
1. After the implant level impression is made, a temporary or healing abutment may be placed into the well of the implant. Select an abutment that will laterally support the interdental papillae without encroaching upon them. Often it is desirable to reduce the buccal dimension of the temporary and healing abutment to avoid recession of the soft tissue. Both the temporary and healing abutments may be modified to achieve a desired soft tissue contour. Neither of these abutments should be loaded with a transitional prosthesis.
Temporization Technique — Option 2
 |
 |
 |
 |
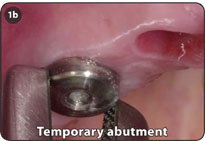
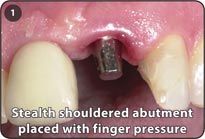
1. After making an implant level impression, select an appropriate stealth shouldered abutment that supports the interdental papillae without encroaching upon them, and place it into the well of the implant with only finger pressure to facilitate the fabrication of a transitional crown. Alternatively, non-shouldered abutments with their corresponding acrylic sleeves may be used for temporization.
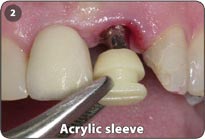
2. Select the appropriate acrylic sleeve and snap it onto the stealth shouldered abutment. The acrylic sleeve should support the interdental papillae without encroaching upon them. The sleeve may be modified to facilitate the contouring of a gingival emergence profile.
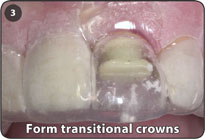
3. Inject transitional crown material (e.g., Integrity™ by Dentsply) around the acrylic sleeve to form the transitional crown with or without a vacuum formed template.
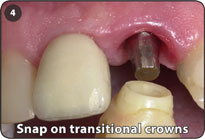
4. Snap the transitional crown onto the stealth shouldered abutment. Cement is usually not needed for the transitional crown.
Page 1 | Page 2 | Page 3 | Page 4 | Page 5 | Page 6 | Page 7 | Page 8 | Page 9 | Page 10 | Page 11 | Page 12