Impression Technique and Components
Download PDF
 |
Impression and Temporization Options |
 |
Impression Assembly |
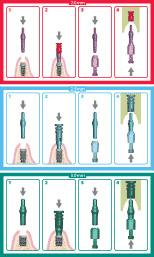
Implant Level Impression Components: Two-Piece System
2.0mm Impression Components
| Description | Style | Part Number |
| 2.0mm Impression Post and Sleeve* | Titanium | 260-100-423 |
| 2.0mm Implant Level Impression Kit* * | Titanium | 260-100-424 |
| 2.0mm Impression Sleeve (4) | Plastic | 260-100-425 |
| 2.0mm Implant Analog (2) | Titanium | 260-100-188 |
*Contains two titanium impression posts and two plastic impression sleeves.
* *Contains one titanium impression post, two plastic impression sleeves and one titanium analog.
2.5mm Impression Components
| Description | Style | Part Number |
| 2.5mm Impression Post and Sleeve* | Titanium | 260-100-413 |
| 2.5mm Implant Level Impression Kit* * | Titanium | 260-100-414 |
| 2.5mm Impression Sleeve (4) | Plastic | 260-100-415 |
| 2.5mm Implant Analog (2) | Titanium | 260-100-288 |
*Contains two titanium impression posts and two plastic impression sleeves.
* *Contains one titanium impression post, two plastic impression sleeves and one titanium analog.
3.0mm Impression Components
| Description | Style | Part Number |
| 3.0mm Impression Post and Sleeve* | Titanium | 260-100-433 |
| 3.0mm Implant Level Impression Kit* * | Titanium | 260-100-434 |
| 3.0mm Impression Sleeve (4) | Plastic | 260-100-435 |
| 3.0mm Implant Analog (2) | Titanium | 260-100-388 |
*Contains two titanium impression posts and two plastic impression sleeves.
* * Contains one titanium impression post, two plastic impression sleeves and one titanium analog.
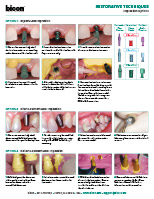
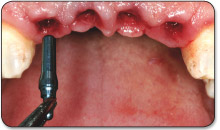
Implant Level Impression
 |
 |
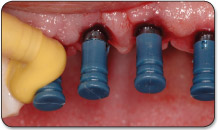
| 1. Insert blue impression post for 2.5mm well implants using finger pressure. | 2. Insert blue impression post for 2.5mm well implants using finger pressure. |
 |
 |
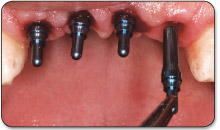
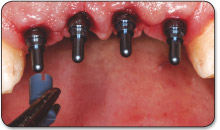
| 3. Snap on impression sleeve. | 4. Snap on impression sleeve |
 |
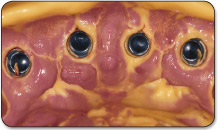 |
| 5. Inject impression material. | 6. Withdraw impression and sleeves. |
 |
 |
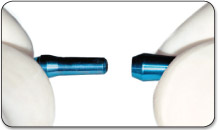
| 7. Assemble titanium posts and analogs. | 8. Insert assembly into impression. |
 |
|
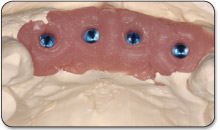
| 9. Pour a stone model. |
Note: An implant level impression provides the opportunity for selection and modification of the abutment at the laboratory as well as for the extra-oral cementation of the crown.