Immediate Stabilization and Functioning Technique
Protocol for Immediate Stabilization and Functioning Technique:
The Immediate Stabilization and Function technique is a predictable treatment regardless of the quality of bone or the initial stability of the implant in the osteotomy. The only criterion for success of this treatment (in addition to the normal implant placement techniques) is the chairside prosthetic stabilization of the implant with a transitional prosthesis. The prosthesis must be stabilized by bonding it to adjacent teeth or to other implants during the period of osseointegration. A close working relationship between the surgical and restorative dentist must be present for successful treatment with a compliant patient who will monitor and attempt to preserve the immobility of the transitional prosthesis.
Materials
- HA coated implants (recommended)
- Stealth shouldered abutments
- Tall and short acrylic sleeves
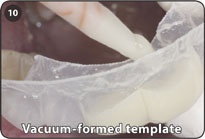
- Vacuum-formed template of intended transitional prosthesis
- Transitional crown bonding materials
- Transitional crown composite material: Integrity™ by Dentsply and/or DiamondCrown™ by DRM
- Reinforcing fiber (not necessary if Integrity™ or DiamondCrown™ material is used in sufficient bulk)
Immediate Stabilization and Functioning Technique
 |
 |
 |
 |
 |
 |
 |
 |
 |
 |
 |
 |
 |
 |
 |
 |
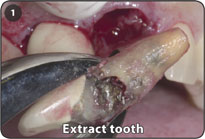
1. Extract tooth and/or prepare osteotomy in conventional manner.
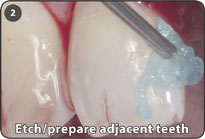
2. Prior to preparing the osteotomy, etch and prepare the adjacent teeth or crowns for bonding.
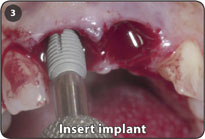
3. Insert appropriate implant so that it is at least 5.0mm below the buccal soft tissue.
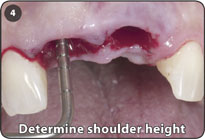
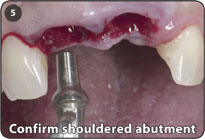
4. Use shoulder depth gauge to determine the appropriate shouldered abutment height. The 5.0 x 4.0mm or the 4.0 x 3.5mm shouldered abutments are usually the appropriate abutments to be utilized. If shrinkage of tissue occurs during the healing phase, a shorter shouldered abutment height may be used for the final prosthesis with a subgingival margin.
5. Choose appropriate shouldered abutment width based on the anatomy of interdental papillae. Abutments and acrylic sleeves should be wide enough to support interdental papillae without encroaching upon the papillae.
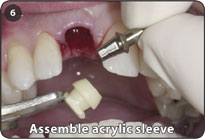
6. Based on anatomical space considerations assemble a tall or short acrylic sleeve to the abutment extra-orally.
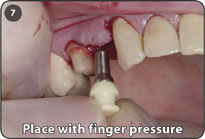
7. Place selected shouldered abutment into implant with finger pressure only for fabrication of a transitional stabilization prosthesis.
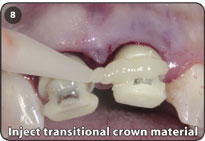
8. Inject transitional crown material around the acrylic sleeves to make an acrylic strut or bridge between the adjacent teeth.
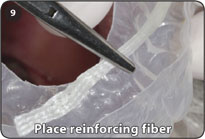
9. Place a reinforcing fiber such as Connect by Kerr into lingual aspect of template to strengthen the transitional prosthesis. The reinforcing ribbon is usually not necessary when using sufficient bulk of Integrity™ or DiamondCrown™ for the transitional prosthesis.
10. Place transitional crown material into the occlusal half of vacuum formed template and insert the template over the acrylic sleeves and strut intra-orally to form the transitional prosthesis.
11.Remove template and polish transitional prosthesis leaving interproximal extensions for stability.
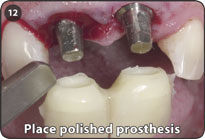
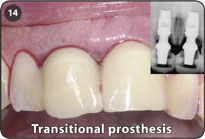
12. Place polished transitional prosthesis onto abutment to confirm fit and occlusion. Usually, no cement is required between the prosthesis and the abutments, since the transitional prosthesis snaps onto the abutments.
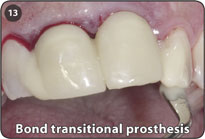
13. Bond transitional prosthesis to adjacent teeth in a secure manner to stabilize the transitional restoration. Alternatively, if care is taken, the prosthesis may be bonded directly onto the adjacent teeth without being removed for polishing, especially when DiamondCrown™ is used as a veneer over the adjacent teeth.
14. IMPORTANT: Admonish patient that it is of paramount importance that there be NO movement of the bonded transitional prosthesis. Have patient return for additional bonding, if any movement of the transitional prosthesis is perceived.
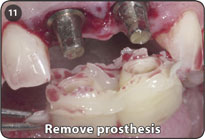
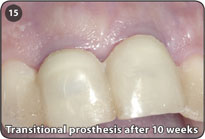
15. After a minimum of 10 weeks of healing, the transitional prosthesis may be removed and the implants may be restored in the intended manner.
16. Final restorations and radiograph of Integrated Abutment Crowns.
Notes: Statistically, a 2.0mm diameter abutment post will move 0.1mm into the well of an implant from its initial insertion to its being definitively seated, and a 3.0mm abutment will move 0.25mm.