Overdenture: Brevis Abutment
Page 1 | Page 2 | Page 3 | Page 4 | Page 5
Brevis Chairside Technique
 |
 |
 |
|
 |
 |
 |
 |
 |
 |
 |
 |
 |
 |
 |
 |
 |
 |
1. A registration of the denture’s occlusal relationship prior to the uncovering of the implants will assure that the denture is not inappropriately displaced by the abutment or its housing.
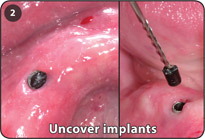
2. Uncover each implant using a small crestal incision and use the healing plug removal instrument to facilitate the removal of the black healing plug.
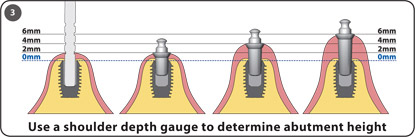
3. Use a shoulder depth gauge to facilitate the selection of the abutment height.
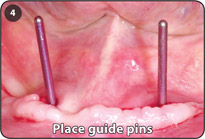
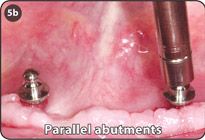
4. Place guide pins into the implants to determine their axial inclinations.
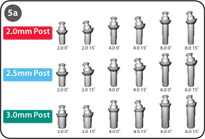
5. Rotate a combination of 0˚ and/or 15˚ angled abutments to achieve parallelism prior to their being seated. Brevis abutments are available in heights of 2.0, 4.0 and 6.0mm.
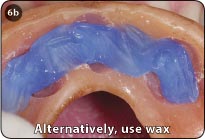
6. The top of the abutment may be marked with a felt tip pen to indicate the location of the abutment on the denture. Alternatively, place soft wax in the denture to act as a pressure indicator to determine the relative position of the abutments.
7. Place a Brevis housing on each abutment
intra-orally.
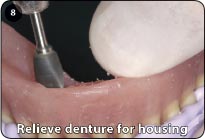
8. Liberally relieve denture to accommodate the Brevis housings. Confirm clearance for housings by placing the denture over the housings.
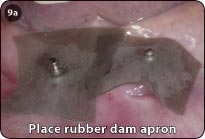
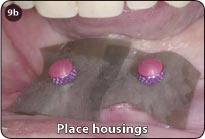
9. Remove the Brevis housings and place a piece of rubber dam over the abutments to act as an apron to prevent acrylic from locking onto an abutment. Ensure that the rubber dam protects the undercut of the abutment from acrylic, by placing it above the shoulder of the abutment. Place a Brevis housing back onto each abutment.
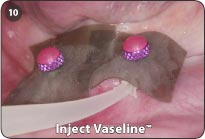
10. Inject Vaseline™ under the rubber dam aprons to serve as an additional precaution to prevent acrylic from locking under the abutments during the chairside pickup of the Brevis housings.
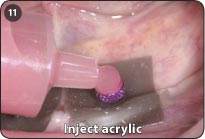
11. Inject flowable acrylic around the Brevis housings and into the relieved portions of the existing denture.
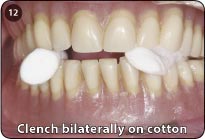
12. Place the denture into the mouth and instruct patient to clench bilaterally on cotton rolls to assure proper bilaterally uniform seating of the denture.
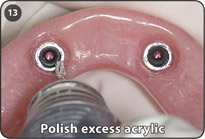
13. Polish the excess acrylic around the Brevis housings after the removal of the rubber dam.
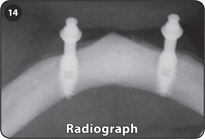
14. Radiograph of two Bicon implants and Brevis abutments. It is paramount that overdentures be completely tissue borne and only implant retained. If the acrylic is too viscous or only placed in the denture, it may cause displacement of the housing resulting in a misalignment of the housing and excessive wear of the rubber o-rings.
Note: If the denture is inadvertently locked onto the Brevis abutment, it is advisable to tap it off rather than attempting to cut it off.
The denture may be notched to facilitate the placement of a tapping instrument. Either the denture will be removed from the abutment or the abutment will be removed from the implant.
Measurement Guide: Brevis Abutment
| The design of the Bicon abutment system is such that the hemispherical base of the abutment does not sit flush with the neck of the implant. By design, there is a space below the abutment post when the abutment is fully seated. When viewing this on a radiograph, it can be seen as a radiolucency. Please note that the post of any abutment may not be modified. Altering the abutment post in any manner or using a cementing medium will affect the frictional fit of the locking taper resulting in a potentially non-retentive abutment. The following diagram depicts the final seating of an Brevis abutment as well as the method for measuring each abutment. |
 |
The height of the Brevis abutment is measured from the top of the implant to the shoulder of the Brevis abutment. The available heights are 2.0, 4.0 or 6.0mm. The total height from the top of the implant to the top of the abutment is approximately 5.5, 7.5 or 9.5mm, respectively. |
Keys to Success
- Use an occlusal registration jig to prevent inadvertent displacement of the denture during the chairside technique.
- Use the 15˚ Brevis abutment to help achieve parallelism for non-parallel implants.
- The denture should NOT rock or pivot on the abutments or the housings.
- Do not make a direct impression of the overdenture abutments.
- Use a rubber dam and Vaseline™ to prevent locking of the denture beneath the undercut of the abutments.
- Place acrylic into a syringe for ease of use and greater control.
- A too viscous mix of acrylic may inappropriately displace the orientation of the Brevis housing on the abutment.
- It is essential for the patient to clench bilaterally on cotton rolls to ensure proper seating of the housings in the denture.
- If the denture is too retentive, slightly relieve the inside of the rubber o-ring lumen with a round bur.
- A common cause of accelerated rubber o-ring wear is a Brevis housing whose retentive acrylic was polymerized while the Brevis housing was not appropriately aligned on the abutment.