Seating of Abutments
Preparation
 |
|
 |
 |
 |
 |
Prior to seating an abutment into the well of the implant, consider the following steps to ensure a successful restoration.
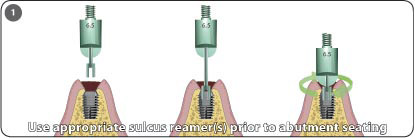
1. Insert a 2.0 or 3.0mm guide pin into the well of the implant. Assemble a threaded knob or straight handle onto a sulcus reamer. The width of the sulcus reamer should be one size larger than the diameter of the intended abutment. Slide the sulcus reamer over the guide pin and rotate while pressing it toward the alveolar crest. The rotating and pressing motion should continue until all bony interferences have been removed. There is a stop on the guide pin to prevent excessive bone from being removed and/or damage being done to the implant.
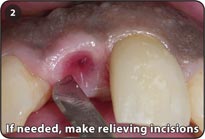
2. It may be necessary to make two oblique crestal relieving incisions that will allow the abutment to displace the soft tissue while it is being seated.
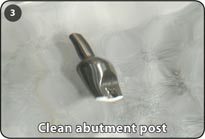
3. If an abutment is not taken directly from its sterile packaging, it should be steam cleaned, ultrasonically cleaned, or wiped clean with alcohol to remove any contaminants prior to its insertion into the well of an implant.
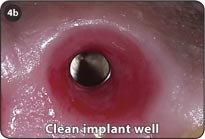
4. Clean the implant well with alcohol if it has been contaminated with any blood or saliva for an extended period of time.
Positioning
 |
 |
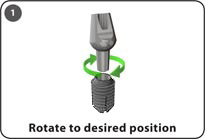
Each Bicon abutment connects to the implant using a 1.5 ˚ locking taper. The locking taper allows for 360˚ of universal abutment positioning.
1. Place the abutment into the well of the implant and rotate it to the desired position prior to its initial seating
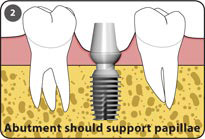
2. The abutment width should adequately support the papillae without encroaching upon them. Note: All bony or soft tissue interferences in and around the implant well should be removed, since if the sulcus is not large enough for the hemispherical base of the abutment or there are bony interferences, the locking taper connection will not fully engage — resulting in a potentially loose abutment especially for unsplinted maxillary anterior restorations.
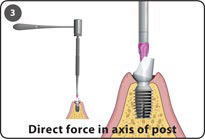
Seating:
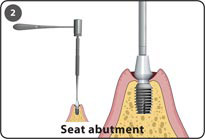
Once proper preparation of the site has been made and the abutment position has been determined, the abutment is tapped into the well of the implant to engage its 1.5˚ locking taper connection. The locking taper connection is engaged by a few seating taps directed in the long axis of the abutment post and implant well.
 |
|
 |
 |
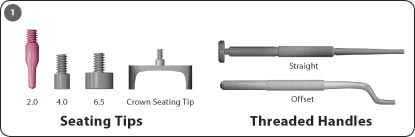
1. Assemble a seating tip onto the straight or offset handle.
2. Tap the handle with a few definitive taps using a 250g mallet. The force necessary to seat an abutment is equivalent to dropping a one-ounce weight the distance of eight inches. It is critical that the tapping force be directed in the long axis of the abutment post and implant well, especially for unsplinted maxillary anterior abutments.
3. Many angled abutments are notched to allow for the use of an angled abutment seating tip to facilitate the direction of the tapping force in the long axis of the abutment post and implant well.
Keys to Success
- Avoid direct handling and damaging of the abutment post.
- Remove bony and soft tissue interferences in and around the implant well as well as excessive interproximal crown contacts.
- Clean and dry the implant well and abutment post with alcohol.
- Tap the abutment and restoration a few times in the long axis of the abutment post and implant well with a 250g mallet.
- Avoid implant trajectories that require angled abutments — especially mesial or distal angulations.
- Avoid placing unsplinted maxillary anterior implants unless the patient has stable posterior oclusion.